![How to Install Composite Decking [Step-by-step guide]](https://www.tilemerchant.ie/wp/wp-content/uploads/2023/05/how-to-install-decking-step-by-step-guide.jpg)
How to Install Composite Decking [Step-by-step guide]
How to Install Composite Decking [Step-by-step guide]
Introduction
Composite decking is the sustainable, safe, and cost-effective alternative to natural timber. It is an artificial product composed of recycled thermoplastics and wood fibres, meaning that whilst it retains the striking beauty of wood, it is protected against the elements.
Alpha Deck – our unique composite decking – is both slip and rot resistant, and designed specifically for Ireland’s market and weather. What’s more, composite decking’s hidden fastening system not only makes it easy to install, but delivers a flush, clean, and polished finish. To learn more about the differences between composite and wood decking, read our article here.
This article is going to teach you the best way to install composite decking, but before we begin, there are some preliminary health, safety, and preparatory procedures you follow.
Safety and Preparation
As with other building work, it is important to work safely and to take suitable safety precautions including the wearing of protective clothes, gloves, safety goggles and dust mask. Having taken delivery of your boards, we recommend you allow them a day to adjust to your local temperature and conditions, before starting work.
We do not recommend installing your deck in cold weather. Your decking boards can be worked with normal woodworking tools. We recommend using a wood saw with a fine-tooth blade to cut boards to size. When cutting, care should be taken to ensure that boards are properly supported.
Notes on Location and Material
These are two crucial areas to consider when planning your installation.
If planning to build on a pre-existing patio, a concrete foundation, or solid surface, then you can safely build a joist network (decking frame) directly on top of your low-lying installation area.
If planning to build on a roof terrace or balcony, you’ll need to raise your frame away from the surface by building it on a network of pedestals; this is to ensure that you do not damage your roof’s waterproof membrane. And if planning to build on soft or uneven ground, then you’ll need to first build a network of posts (cemented into the ground) on top of which you can build your decking frame; this is to ensure that your decking is built solid and level, whilst minimising the elemental damage to your frame over time.
This is our best advice for how to install composite decking on the ground. In all scenarios, composite joists are preferable, given their natural resistance to the elements.
However, if you prefer to use natural timber, we highly recommend you use tanalised (pressure treated) wood, and seal any exposed ends after cutting, to ensure the longevity of your frame.
Composite Decking Installation: How to Install Decking
You can follow our own YouTube Guide on ‘How to Lay Composite Decking’ whilst installing if you’d like a visual aid.
HOW TO INSTALL COMPOSITE DECKING
- Step One: Build the frame
- Step Two: Lay the first board
- Step Three: Lay the rest of the composite decking boards
- Step Four: Install the final two boards
- Step Five: Fascia finish

STEP 1: Build the frame
1. After making your measurements and ensuring the ground is solid and even (having built any additional support structure for composite decking required), lay out your framework.
Space your composite decking joists evenly apart – standard residential spacing is 16 inches, but a safe range is anywhere between 12 and 24 inches apart. The closer the spacing, the sturdier the frame. Also consider the thickness of your joists; the thicker and stronger your joists, the more secure your decking.
2. Next, secure your frame by screwing the joists together. If laying on top of your patio or cement, then the weight of the finished construction is all you need to secure the framing to the ground. Otherwise, fasten the frame to the ground by screwing it into your post/pedestal network (cemented into the earth if necessary).
IMPORTANT NOTES: Make sure to leave a 10mm gap where joist ends meet cross beams, to allow for expansion, and that (if using composite lumber) you oversize the bolt holes by 3mm for the same reason. If cementing a post network into the ground, ensure your posts are safely cemented up to at least 500mm below the surface.
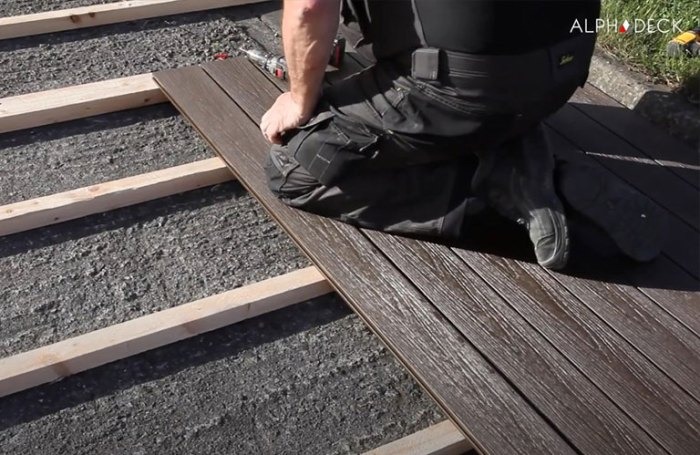
STEP 2: Lay the first board
1. Firstly, position your hidden starter clips at each end of your frame, and at the top of the frame’s joists at regular intervals in between. You will be pushing your board into these clips, so ensure that where they sit is flush with the edge of your frame. Screw the starter clips into your frame.
2. Now, push the first decking board so that the starter clips fit into its side groove. Ensure that the board is pushed until tightly secured.
3. Lastly, where the first board meets each of your frame’s joists, push the toothed side of a special clip into the exposed side groove (other side from the hidden starter clips).
Screw each of these special clips into both the first board and the frame’s joists, through the pre-drilled holes (to fasten composite deck boards). Make sure the screw holes are in line with the joists’ centres, and that you use one fastener per board at butt joints, as well as at board ends and each joist.

STEP 3: Lay the rest of decking boards
To lay each additional board, simply place its exposed side grooves against the special clips of the previous board, applying light force to ensure that it connects securely, then repeat – placing and screwing special clips into the other edge of the board, and then sliding the next board into position, and so on, until you’re left with just the final two boards of your decking to install.
IMPORTANT NOTE: Ensure that the gap between cross sections of decking is no less than 3mm to allow for expansion.
STEP 4: Install the final two boards
1. Knowing the width of the final two boards (including the gap between them), mark on the final joist where the edge of the last board will lie.
2. Now, as you did when laying the first board, use your markings to screw your hidden starter clips at each end of your frame, and at the top of the frame’s joists at regular intervals in between.
3. Push the final board up against these hidden starter clips, clicking it into place.
4. Further secure the final board to the frame by screwing special clips into each joist and into the side groove of the final board (on the side facing the rest of your previously laid decking)
5. Now, take your penultimate board, and at an angle push one length of it against the exposed special clips of your final board, clicking it into place.
6. Finally, slide your last special clips along through the gap on the other side of your penultimate board, between the 2nd and 3rd last boards, and when you have positioned them in the centre of each joint, screw these into place.
STEP 5: Fascia finish
Last but not least, it’s time to cover up the remaining exposed frame with composite decking fascias, giving your decking that flush, sleek finish. To do so, simply cut the fascia pieces to size, and screw them onto the ends of the frame at regular joist intervals.

Final Thoughts
Composite decking is a sustainably sourced, rot-resistant, anti-slip and durable alternative to natural timber.
There is no need to seal or paint composite decking (with Alpha Deck’s many composite decking colours to choose from), and it is designed to last up to 25 years, with no need to carry out the expensive and laborious annual maintenance you would need to with natural wood decking.
Our tutorial (here and on YouTube) details the best way of laying composite decking.
If you require assistance installing your composite decking, see here for our list of trained professionals: https://www.tilemerchant.ie/contractors
For any additional information on composite decking, visit our composite decking range on our website.
Happy DIY-ing!
Why Tile Merchant?
We offer extremely competitive pricing on our entire range of tiles and likewise. We stock a huge range of wall and floor tiles and our prices are competitive for retail and trade. Our stock is widely available in our tile stores in Dublin and Ashbourne (Co. Meath) which are open 7 days a week.
Alternatively, if you’d prefer to shop our tiles online, we can supply you with samples delivered for free.

Article written by Calum
Cal Bannerman is a freelance writer, editor, podcaster and voice actor from the Scottish Borders. He runs the storytelling podcast "Stories from the Hearth" and lives in a wee Glasgow Flat with his partner and their cat".